Media Item Properties & Hotkeys for batch editing items (Rapid-fire Reaper Tutorials Ep76)
- Arya Afshar

- Jun 2, 2021
- 7 min read

Hey folks!
This episode is kind of a part II of our last episode on editing items. In the last episode, we looked at multiple actions that we use often, and we assigned one-key shortcuts to all of them. There's a lot of additional stuff we may wanna do to items, most of which are accessible through the Media Item Properties window. So we're gonna start with a quick tour of the Media Item Properties window, and then talk about a bunch of unassigned native actions, some SWS and some cycle actions I like to use, in order to avoid having to open this window for quick edits.
Media Item Properties
You can access the media item properties 3 ways:
-Default Mouse Modifier: Double-clicking on any item will open the Media Item Properties (from here on MIP)
-Default shortcut: Pressing F2 will also open MIP.
-Right-clicking: Select any number of items, right click and select MIP.
Using any of these methods will open the window below. This window is Dynamic, meaning the information is updated in real-time based on what item(s) are selected. All the boxes and bars work both ways, meaning they display the information for selected items, but also, typing into them and hitting APPLY will apply the new values to the selected items. When multiple windows are selected, some boxes may go blank. Those are boxes whose information is not the same for every selected item, but you can still type any value into them and apply that to every selected item.

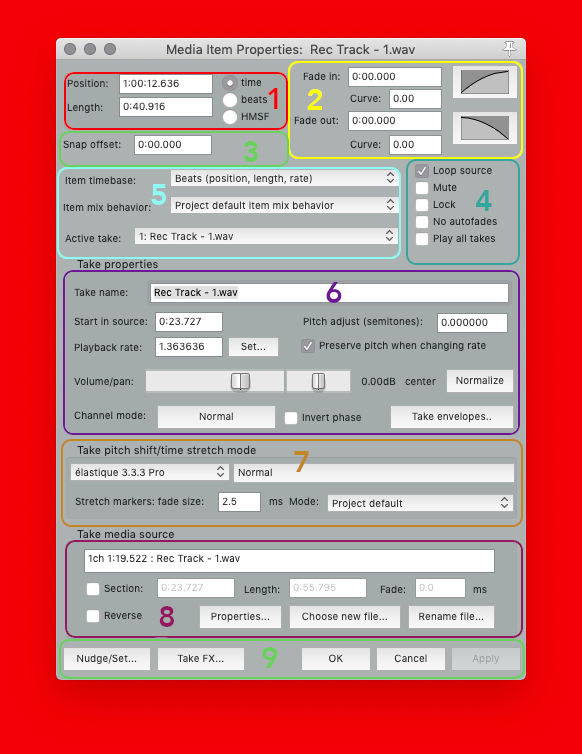
Media Item Properties window. Read the breakdown below. 1. Position & Length: This section displays the position & Length of each item on the timeline. You can select time, beats, or timecode as the unit, and you can additionally type into these bars to set the position or length for any item. Useful if, for example, you have a number of items that all need to be 1 second in length. Simply type 1 into the box and hit apply! 2. Fades: This section displays the length, curve and type of fades on items. Once again, typing any value into those boxes and hitting apply will apply a mass fade to all items. You can also remove all fades from several items by typing 0 into the boxes. Very useful for batc fading! 3. Snap Offset: Creates a snap offset for selected items. Snap offsets are useful for items with a slow envelope, where you may want to sync not their beginning, but their peak value to the edit cursor. 4. Item controls: A. Loop source: Toggles item looping. When unticked, trimming the item out beyond its contents will result in silent items, but when ticked, the item will loop continuously. I have set the action 'Item properties: Loop item source' to Cmd+Shift+L. B. Mute: Toggle mutes on items. In REAPER you can mute tracks, but you can also mute items, which is useful when you don't want to delete items, but still want them not to be heard. I have set 'Item properties: Toggle mute' to Ctl+M. C. Lock: Toggle item locking. As mentioned in this episode of RFRT, locked items cannot be moved, trimmed, and their fades, volume, pan, and FX can't be adjusted. I have set Ctl+L to 'Item properties: Lock', and Ctl+U to 'Item properties: Unlock' D. No autofades: REAPER has several preferences to create fades and crossfades automatically. This option is suitable to turn off these automatic properties for specific items. Ticking this box will "lock" the item fades, so that it's only possible to change through this window or by manually adjusting the fade using mouse modifiers, but it won't create new fades or adjust current fades when overlapping other items. I don't have a shortcut assigned to this box, as I don't use it often enough. The box is always two clicks away! E. Play all takes: Normally, items containing takes will play the selected take, but ticking this box will simultaneously play all takes on the item! I don't have a shortcut assigned to this box, as I don't use it often enough. The box is always two clicks away! 5. Timebase and Mixing behaviour: Use this section to select a different timebase for your items (explained in this video and this one). 6. Take Properties: A. Take name: renames the item (by default items take the name of their source file. Changing this won't affect the source file. B. Start in source: Sets the start time (in seconds) of the item based on source. As an example, in the image above, my item starts 23 seconds into the source file. C. Pitch, playback rate and Preserve Pitch box: Normally, when you change the rate of any item, you will change its perceived pitch. Every bit of audio is made up of sound waves of different frequencies. So changing the speed of playback affects the speed of all frequencies, resulting in a new perceived pitch*. With the box unticked, changing the rate will change the pitch, but when the box is ticked, reaper tries to preserve the initial pitch of the item while changing playback rate. This CAN noticeably or subtly degrade the quality of the audio. The more you adjust the rate, the harder it is for it keep sounding good. The quality is further affected by the type of pitch shift algorithm used, a topic too deep for this tutorial, but the best way to find out which algorithm to use is through experimenting with different algorithms and options. Pitch can then further be adjusted, without affecting playback rate, and once again, how good this will sound will depend on how much pitch shifting is occurring, as well as what algorithms are used. For a full list of shortcuts for this section, see below. *Note: I use the term perceived pitch, because not every piece of audio has a clear and discernible pitch! For example, a recording of traffic could include so many random frequencies, that our brain will not be able to pinpoint its pitch, like we can do with, say, a violin melody, but changing its playrate can still make it sound higher or lower, by amounts that fall within the 12-tone equal temperament tunings or other types of tuning. D. Volume/Pan/Phase/Normalize: Self-explanatory. These boxes allow you to change these settings for an item, without having to do it on a track! A full list of all the actions and shortcuts for this section will follow shortly. E. Channel mode: Using this box, you can select which channel(s) of the source file to play. With a stereo file, you can play only the left channel, only the right, downmix both channels to mono, reverse the stereo (so Left plays out of right and vice versa) or go back to normal. With multichannel source files, you can select any number of channels in many different configurations. I have created a basic cycle action for this which you will see below. F. Take envelopes: Toggle various envelopes for the item visible using this window. I have some hotkeys for these so there's never a need to open that submenu. 7. Take pitch shift/time stretch mode: We will revisit this topic later, but these boxes toggle between different algorithms for time stretching and pitch shifting. Experiment to find which algorithm works best for which type of file. For example, percussive sounds work better with certain algorithms, while some work better for speech. Also, monophonic sounds and polyphonic sounds may respond better to certain algorithms. 8. Take media source: These options allow you to modify the underlying source file for any item, replace it, change its length, start time and fade time, as well as reverse the source file. Under properties, you have additional information such as sample rate, bit depth and channel count, and for video items, you can choose to include or ignore the audio embedded into the video file. 9. Sub-menus and action buttons: A. Nudge/Set: opens a submenu where you can make specific adjustments to the start time, position, or length of items. We will explore this submenu in detail later! B. Take FX: As you probably know, REAPER allows you to put plugins on your items. This box will open an FX Window for selected items. If you have your item labels showing, this box won't be necessary to ever open. C. OK: Applies changes (if any) and closes the window. Hitting return/enter twice will also work as if OK was pressed. D. Cancel: disregards all changes and closes the window. Escape will do the same. E. Apply: Applies edits (if any) to selected items, but keeps the MIP window open. Hitting enter/return once will do the same. Actions & Shortcuts While this window is very useful for quickly viewing and editing properties for a number of files, and especially useful for batch fading, trimming and renaming, there are many other things we can do through this window, that we may want to do without opening it. A lot of these are native reaper actions with no assigned shortcuts, and a few are customs. I do my best, when possible to have these hotkeys be similar to their track counterparts, so for example, since we use V and P to toggle the track Volume and pan visible, I have assigned Ctl+V and Ctl+P to toggle the take volume and pan visible. I also try to stick to the same modifier (Ctl) for these, which helps me remember these hotkeys, and base them off of their track counterparts. Lets's look at them!

Cycle Action: Cycle take channel modes

Conclusion
The MIP window is awesome for a lot of stuff, but also our hotkeys help us perform several of these operations quickly and without needing to open it, speeding up our workflow. Here's the video:

If you like the work I do, you can donate to me here! Every little helps, so even if you send a dollar or two my way, I’ll be eternally grateful to you! Join the REAPER squad on our Discord: https://discord.gg/YwQESKpBfE
My Reaper Stash: https://stash.reaper.fm/u/IDDQDSound
Follow me on Instagram: https://www.instagram.com/iddqdmusic/
My Music: https://Soundcloud.com/iddqdmusic


Comments